 Deutsch
![[Translate to english:]](https://hilfe.heinekingmedia.de/fileadmin/_processed_/b/e/csm_DSB-touch_cubi_686d429d8c.png "[Translate to english:]")
Introduction
Welcome!
This manual provides the basic information you need for the optimal usage of your DSBtouch with stand-alone-player. Please read and follow the subsequent points carefully, so that you can set up your DSBtouch with stand-alone-player quickly and easily. We show you the necessary settings in just a few steps.
Items delivered
The stand-alone player (MSI PC) comes with a power cable, a power supply and a VESA mount kit.

A remote control, a power cord, batteries, and 2 USB cable (type a to type b) are included in the delivery of the display.

Accepting the delivery
Attention – important note for accepting goods!
Please check directly upon receipt, whether the cardboard or packaging has been damaged (visual inspection). In this case, please refuse to accept the goods! The freight forwarder will take the delivery and initiate a new delivery.
In addition, please check the functioning of the delivered goods immediately after receipt (function test). The device must be unpacked, connected and switched on. If a defect is detected (e.g. damage of the housing) it must be reported to heinekingmedia GmbH within 3 working days after accepting the delivery (see chapter 14 – conduct in the event of damage). Please note that some possible defects of the display can only be detected when the display is switched on (e.g. devices does not start, pixel error, glass breakage)!
If the damage is reported later or if goods with visual transport damage have been accepted, heinekingmedia GmbH cannot initiate a free claims settlement and the customer has to bear all potential costs related to a repair and shipping!
Mounting and wiring
Important mounting instructions for attaching wall mounts to a display.
Information about the wall mount
The displays supplied by heinekingmedia GmbH have mounting devices on the back for mounting wall brackets. These comply with the VESA (Video Electronics Standards Association) standard and consist of four threaded sleeves arranged in a rectangle. The distances and thread dimensions differ depending on the display model. Please make sure to only install the supplied or a specified wall mount.
To prevent display damage, it is important that you have the correct screws ready and test them before mounting the wall adapter to the display. The depth of the threaded holes differs among the different display models. If, by mistake, screws are used that are too long, irreversible damage to the display can occur, which is not covered by guarantees of the manufacturer or heinekingmedia GmbH!
heinekingmedia GmbH recommends that the assembly and/or installation of this product is to be carried out by a competent person. Please refer to your display manual and ensure that the weight and size of the screen do not exceed the maximum weight and size of the wall mount to be used. Please also carefully check, whether the screws used for mounting the screen have a suitable length and diameter.
heinekingmedia GmbH is not liable for damages caused by improper assembly, use of unsuitable assembly material or use of unsuitable tools!
Please note the following:
- Only use screws, which threads are no longer than the depth of the threaded sleeve plus the thickness of the mounting adapter.
- Check the screw depth of the screws by loosely tightening the screws into the threaded sleeve without mounting the holder on the display. You should be able to screw in the screw without any effort.
- If the available screws are too long, you can reduce the screw-in depth by using appropriate flat washers. If possible, do not use more than one flat washer per screw.
- Always tighten the screws carefully by hand until the screw stops.
- Under no circumstances use electrically operated mounting tools such as cordless screwdrivers or drills.
- To tighten the screws, please use a suitable screwdriver and tighten only carefully by hand until finger-tight.
If you follow these instructions carefully, you will be able to mount the bracket correctly onto the display.
Ventilation
When mounting the device on a vertical wall, leave a distance of at least 40 mm (approx. 1.6”) between the rear of the unit and the wall surface. Please observe the installation dimensions listed below to ensure sufficient ventilation. In addition, please ensure that the temperature where the device is deployed always remains below 35 °C (95 degrees Fahrenheit).

Attaching the wall mount - Stand-Alone-Player
Fasten the rear panel of the VESA mount kit to a vertical surface with at least 4 screws (maximum 8 screws possible). Note that the embossed arrow points upwards. Now hang the Stand-Alone-Player with the keyhole-shaped recesses in the housing (narrow side of the recesses facing upwards) on the corresponding hooks.
Wire connections
- Connect the supplied power cord to the connector on the back of the display and connect the other end of the cord to an easily accessible outlet (230V). Switch the main switch (rocker switch) on the rear of the display to "ON".
- Connect the supplied power cable to the stand-alone-player (mini PC) and connect the other end of the cable to an easily accessible power outlet (230V).
- Connect the touch overlay to the stand-alone-palyer and the screen using the two USB cables (type a to type b). Connect the display to Touch Out Screen and the computer unit to Touch Out PC.

Internet connection
Connect a LAN cable (not supplied) to the RJ45 network connector of the stand-alone-player and connect the other end of the LAN cable to a dedicated network outlet, switch or router.
If you want to connect the device wirelessly to a Wi-Fi network, please refer to chapter 6 (Network settings) of this manual.
If the Internet connection is successful, please continue with step 5.
First usage
- Turn on the stand-alone-player and the display.
- After the operating system Windows is started, it takes about 30 seconds until the pre-installed DSBplayer starts.
- When the DSBplayer is started for the first time, it automatically shows a display identification (ID)
Please write the ID down carefully. You will need this identifier later for the screen setup (Chapter 7). - If you want to operate the Windows interface, connect a mouse and keyboard, and press the "F4" key to exit the DSBplayer.
- To start DSBplayer again, open the start menu, navigate to the programs and open the folder "heinekingmedia GmbH". Here you find the link for the "heinekingmedia.Player.Starter". A click on this link starts the DSBplayer.
Network settings
- If a proxy server is used in your network, press the key combination "Ctrl+Alt+P" while the player is active.
- Tick the box "use proxy authentication" and enter the access data in the corresponding fields.
LAN connection
- Make sure that a LAN cable is connected.
- If further settings (e.g. a fixed IP address) are required, please contact your local IT department.
Wi-Fi connection
- Exit the DSBplayer by pressing the "F4" key on a connected keyboard.
- Click on the Wi-Fi icon in the lower right corner of the task bar.

- Select your network, click on "connect" and enter the password (if necessary).
Display setup
- Make sure that you have the access data for the Control Portal, which you have received per e-mail from heinekingmedia GmbH.
- Open an Internet browser on your PC, navigate to the page http://dsbcontrol.de/ and log in with your user data.
- Click on "DSBs" in the navigation bar on the left.
- Click the "add screen" button.

- The license is pre-selected automatically and does not need to be adjusted.
- Enter your display ID, which you noted in step 5, in the second field from the top.
Please note: the "-" character (hyphen) does not have to be entered.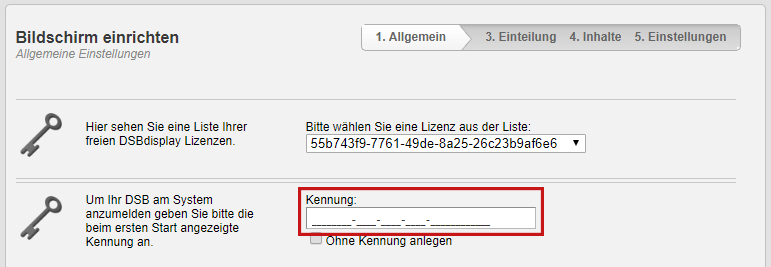
- Fill in the subsequent fields completely, if possible. Mandatory fields are: screen name, description of the location and postcode.

- Click on the "next" button to configure the automatic switch-off times (chapter 9) .
Automatic switch-on times
Automatic switch-on times must be set in the BIOS of the stand-alone player.
- To access the BIOS, connect a keyboard and mouse to the device.
- If necessary, exit the DSBplayer by pressing "F4".
- Open the start menu and click on "on/off".
- Hold down the "shift" key and click on "restart".

- In the following menu navigate to "troubleshoot/advanced" → "advanced seetings" → "UEFI firmware settings" and then click on "restart".
- The device restarts and the BIOS menu appears. In this menu you can navigate with the mouse or keyboard through the arrow keys.
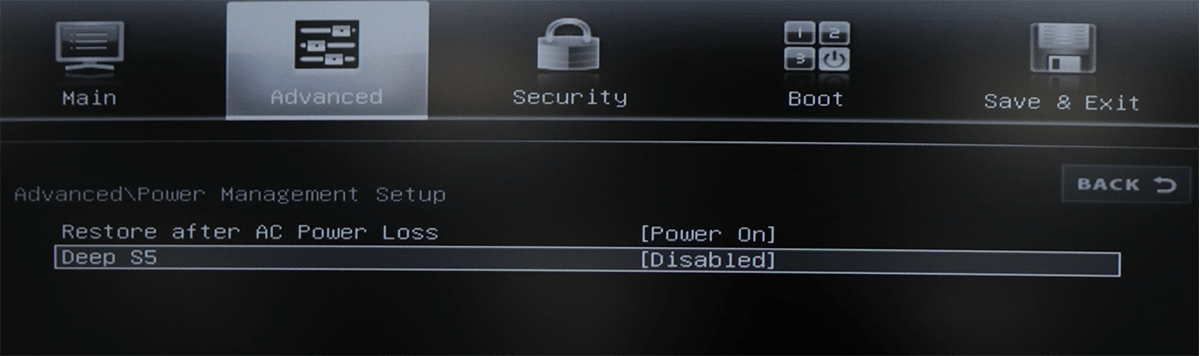
- In the BIOS, select the "power management setup" sub-item in the "advanced" tab.
- The BIOS settings may vary depending on the device. Please look at the following illustrations to see which one fits your device and adjust the individual points as shown.
- Apply the following settings: Deep S5 to "disabled" and EuP 2013 to "disabled".
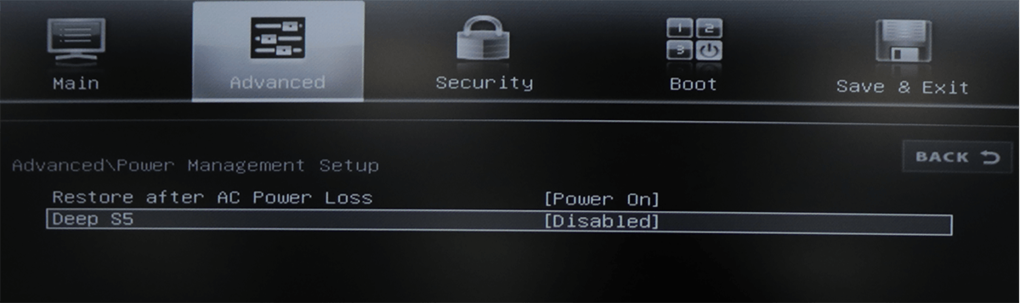
- Exit the Power Management Setup by pressing the "Esc" key on the keyboard.
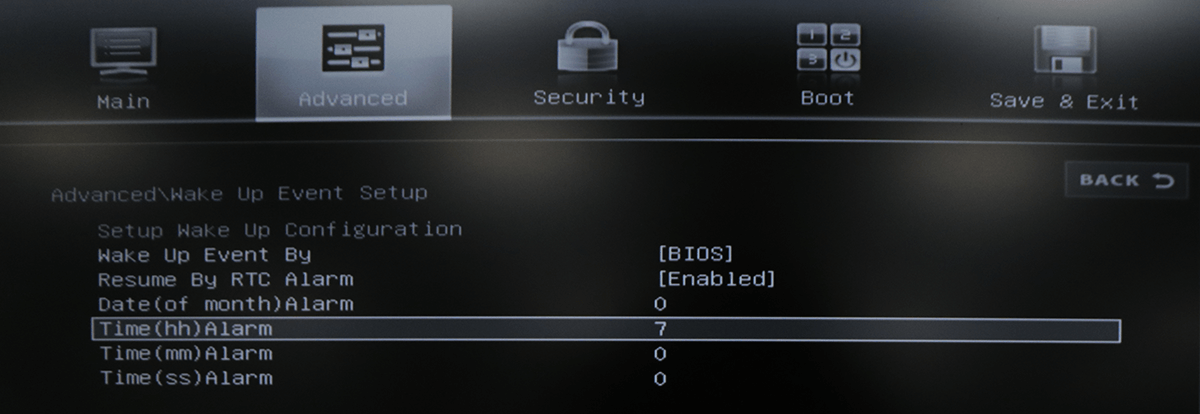
Now select the "wake up event setup". Here you can configure the daily switch-on time by entering the desired time in the "Time (hh) Alarm" for hours and "Time(mm) Alarm" for minutes. You can use the + and - keys on the keyboard or enter the time directly using the numeric keys. Confirm the entry with "enter".
To save your configuration, press the "F10" key and confirm with "yes". The unit will restart.
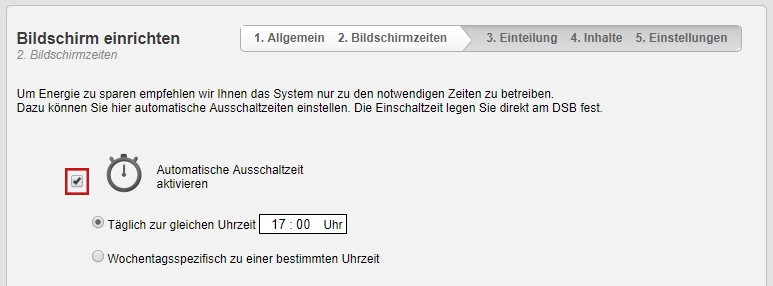
Automatic switch-off times
- Tick the box "activate automatic switch-off time".
- In the next step, specify, whether the device should shut down "daily at the same time" or "weekday-specific at a specific time".
- Click on "next" to continue with the setup of the Screendesign.
Screendesign
- Here you can choose to create your own Screendesign or select a Screendesign template.
- We recommend that you use a template at the beginning. To do this, click the "use template" button.
- Now select a suitable graphic or static template for you.

- Once you have selected a template, click "next".
- On the next page you have the option to allocate names to the individual sectors and select the module type. The following applies:
- In multimedia modules you can display uploaded documents (e.g. Word, PowerPoint, images) and the provided external content (e.g. weather).
- News ticker modules are purely text-based and can display news or RSS feeds created by you or from external websites (e.g. ARD).
- After selecting all module types, click "next".
- On the last page, if you use a DSBtouch with touch function, you can activate it for multimedia modules. To do this, tick "enable touch" or use the "custom settings".
- With news ticker modules you have the possibility to adjust the direction and speed of the news ticker as well as the separators, which are displayed between the individual news, by clicking on "user-defined settings".
Once you have made all the settings, click "save" to complete the setup of your DSB®.
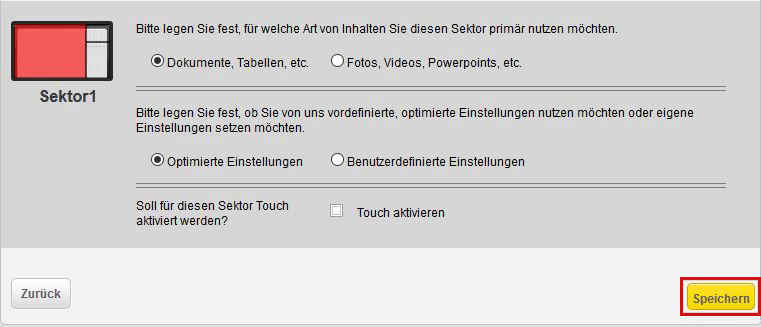
Audio output and volume
If you want to play videos with sound on your device, the audio output for the individual sectors must be enabled in the DSBcontrol Portal.
- Log into the DSBcontrol Portal and click on "DSBs".
- Click on "screen layouts". In the following dialog click on "edit" for the respective screen layout.
- Now click twice on "next".
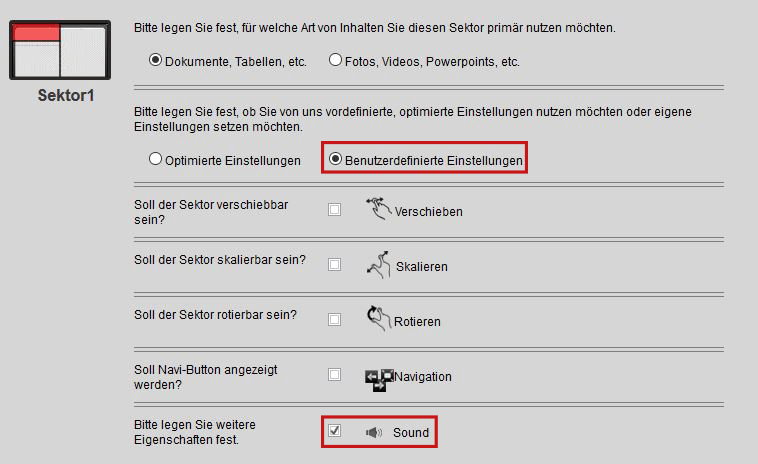
- In the following dialog, select the sector for which the audio output is to be activated and select the "user-defined settings" item.
- Tick the box "sound".
- Then click on "save".
In the next step, please check the volume settings in the Windows operating system of your DSB®:
- Connect a keyboard and a mouse to the stand-alone-player and exit the DSBplayer by pressing the "F4" key.
- The volume settings can be found in the task bar at the bottom right.

- To adjust the volume on the display, point the remote control at the unit and press the "VOL+" or "VOL–" button.
Energy saving settings
The screen has an eco-sensor that adjusts the backlighting of the display to the ambient light to improve image quality and reduce power consumption. If the screen is always to operate with the set backlight value (default is 85%), the eco-sensor can be deactivated.
- Press the "menu" button on the remote control and navigate to "system", then to "eco-solution" and finally to "eco-sensor".
- You can now switch the eco-sensor on or off by pressing the middle button in the control pad.
Additionally, you can adjust the backlight value.
- To do this, select the "image" option in the menu and then the "backlight" submenu.
- Use the left and right arrow keys to adjust the backlight brightness.
Change from landscape to portrait format
By default, the screen is set up for landscape operation. To change this setting to portrait mode, follow these steps:
Settings in the Control-Portal
- Log on to the DSBcontrol Portal.
- Click on "DSBs" and then on "screen layouts".
- Click on "edit" in the "options" category.
- Here you can create a new layout or use a template. Under the templates, you will find several Screendesign templates in portrait format in the static layouts.
- Once you have selected a template, click on "next".
- On the next page you have the option of allocating names to the individual sectors and selecting the module type. The following applies:
- In multimedia modules you can display uploaded documents (e.g. Word, PowerPoint, images) and the provided external content (e.g. weather).
- News ticker modules are purely text-based and can display news or RSS feeds created by you or from external websites (e.g. ARD).
- After selecting all module types, click "next".
- On the last page you can activate the DSBtouch for multimedia modules. To do this, tick "enable touch" or use the "custom settings".
- With news ticker modules you have the possibility to adjust the direction and speed of the news ticker as well as the separators, which are displayed between the individual news, by clicking on "user-defined settings".
- Once you have made all settings, click on "save" to complete the setup of your DSB®.
Settings on the stand-alone-player (mini PC)
The next step is to change the display of your DSB® to portrait format. To do this, connect the mouse and keyboard to your DSB®.
- Press "F4" to exit DSBplayer.
- Right-click on the Windows desktop.
- In the menu that now appears, click on "screen resolution".
- Select "portrait" under "alignment" and click on "apply".
- Confirm the following query with the button "keep changes".
Conduct in the event of damage
If the stand-alone-player needs repair due to damage or malfunction, please send an e-mail to heinekingmedia at the following address: support@heinekingmedia.de.
In order to be able to process your claim, we need some information, which should be mentioned completely in the e-mail. Please note that the repair can only be initiated if the requested information is complete.
- Serial number of the stand-alone-player
(The serial number can be found on the underside of the device on a sticker.) - Location (address, building section)
- Mounting height
- Exact error description
- Ideally photos showing the defect
- How did the damage occur?
- Contact person with e-mail address and telephone number
If your display needs repair due to damage or malfunction, please send us the following information:
- Serial number of the display (See label on the back of the display)
- Location (address, building section)
- Mounting height
- Exact error description
- Ideally photos showing the defect
- How did the damage occur?
- Contact person with e-mail address and telephone number
Our support staff will then immediately take care of initiating the repair of the device and inform you about the subsequent steps.
Help and support
(Applies to netschool customers only!)
If you need further help, please contact the DSB Support Team via +49 (0) 511 67519-354 or by e-mail to support@heinekingmedia.de
Important: You can also find useful tips and video instructions for support and operation in the Control-Portal by clicking on the menu item "help".